Snapping the Perfect Shot: How to Take Breathtaking Travel Photos on a Budget
Snapping the Perfect Shot: How to Take Breathtaking Travel Photos on a Budget - Get the Most from Your Smartphone Camera
Many novice photographers feel like they need an expensive DSLR camera to take professional-looking travel photos. However, thanks to improvements in smartphone camera technology over the past few years, that simply isn’t true anymore. With a few tricks and techniques, you can get stunning, share-worthy travel shots using just your phone.
First and foremost, clean your lens! It’s easy for fingerprints and dust to accumulate on your phone’s camera lens, which can negatively impact image quality. Keep a microfiber cloth in your bag to give your lens a quick wipe-down before shooting. Also, don’t use digital zoom, which degrades image quality. Instead, get closer to your subject or take the shot and crop it later.
When composing shots, use the rule of thirds by placing key elements on imaginary lines that divide the frame into thirds vertically and horizontally. This creates a more interesting, balanced composition than putting the subject dead-center. Also, don’t be afraid to get creative with angles and perspectives. Shoot from above, below, or the side to add visual interest.
Smartphone cameras thrive in bright, natural light. For best results, shoot outdoors during the Golden Hour—the hour after sunrise and before sunset—when warm light produces flattering images. If shooting midday, find open shade to avoid harsh shadows. Also, use HDR mode and exposure compensation to balance brightness in contrasting lighting.
Take lots of photos! Thanks to digital formats, there’s no film to waste. Vary angles, compositions, and camera settings over multiple shots. You can delete undesirable ones later, but you never know when you’ll capture an amazing spontaneous moment. Apps like Camera+ and ProCamera give you more manual control over focus, exposure, and white balance for capturing stunning images on the go.
Lastly, edit your photos to really make them pop! Apps like Snapseed, Lightroom, and VSCOCam provide powerful editing tools right on your phone. Adjust brightness, contrast, saturation and apply filters to enhance mood and visual appeal. With a few simple tweaks, you can transform a plain Jane travel photo into a true masterpiece.
What else is in this post?
- Snapping the Perfect Shot: How to Take Breathtaking Travel Photos on a Budget - Get the Most from Your Smartphone Camera
- Snapping the Perfect Shot: How to Take Breathtaking Travel Photos on a Budget - Master Composition with the Rule of Thirds
- Snapping the Perfect Shot: How to Take Breathtaking Travel Photos on a Budget - Look for Unique Perspectives and Angles
- Snapping the Perfect Shot: How to Take Breathtaking Travel Photos on a Budget - Take Advantage of Natural Lighting
- Snapping the Perfect Shot: How to Take Breathtaking Travel Photos on a Budget - Edit and Enhance with Free Apps
- Snapping the Perfect Shot: How to Take Breathtaking Travel Photos on a Budget - Invest in a Versatile Prime Lens
- Snapping the Perfect Shot: How to Take Breathtaking Travel Photos on a Budget - Use Slow Shutter Speeds for Dramatic Effects
- Snapping the Perfect Shot: How to Take Breathtaking Travel Photos on a Budget - Tell a Story Through Your Photo Series
Snapping the Perfect Shot: How to Take Breathtaking Travel Photos on a Budget - Master Composition with the Rule of Thirds
One of the most important yet often overlooked fundamentals for creating captivating travel photos is mastering composition using the rule of thirds. While high-tech gear like DSLR cameras certainly helps, understanding and utilizing basic compositional techniques can elevate any image, even those shot on a smartphone. The rule of thirds is one such technique used by photography masters across genres to craft balanced, visually appealing shots.
The rule of thirds involves mentally dividing up the image frame into thirds, both vertically and horizontally, creating nine boxes. The key elements of the photo are then placed where these imaginary lines intersect, rather than simply centered. This technique draws the viewer's eye to points of interest and creates dynamism. Photographer Roxanne King explains, "I'm constantly thinking in terms of the rule of thirds for my compositions. I'll move around until I find the right perspective that places my main subject at one of the intersection points. This creates a sense of motion and vibrancy in the scene."
Another benefit of the rule of thirds is it prevents horizons from splitting the image in half. Landscape photographer Karen Schulz advises, "With wide scenic vistas, place the horizon in the upper or lower third of the frame rather than across the middle. This provides balance by giving the land or sky greater prominence." The upper third works best for emphasizing expansive skies with interesting clouds, while the lower third highlights striking landscapes.
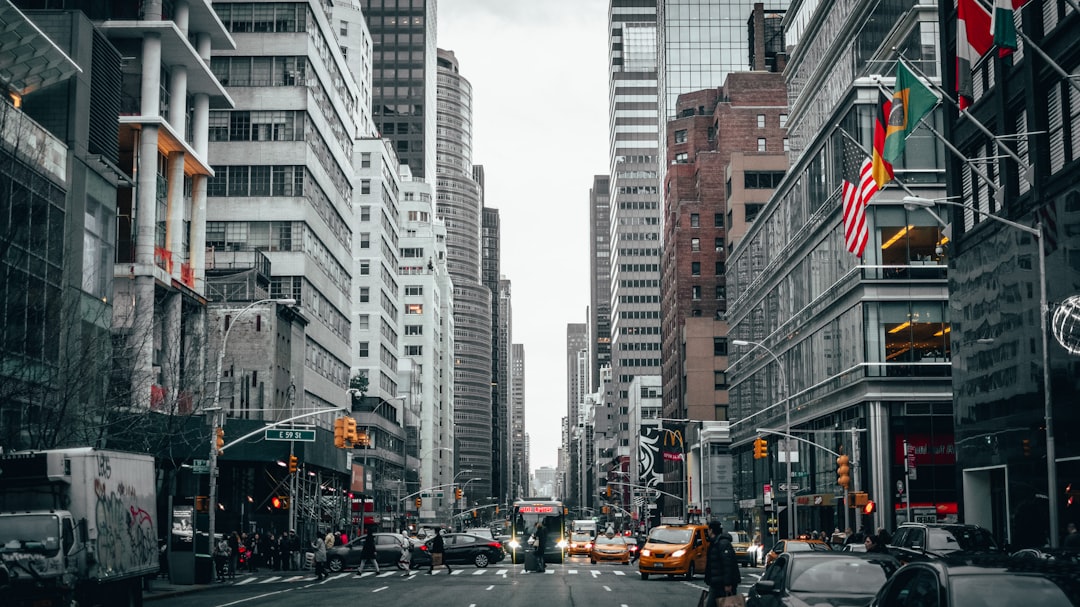
Urban scenes also come to life when embracing the rule of thirds. Architectural photographer Ty Nigh explains his thought process: "I envision dividing up cityscape shots into a grid, then frame up unique compositions placing focal points like buildings, roads, or bridges at intersection points. This creates diagonals and directional lines that add energy." Street photographer Leah Kennedy agrees, "Looking for patterns formed by building designs helps place elements on the third lines, almost like a puzzle. This activates the entire frame."
Though initially challenging, mastering the rule of thirds elevates images beyond snapshots. "It adds artistry and intrigue when done effectively," says photographer Jack Greenbaum. "After practicing it, I began seeing compositions naturally without having to consciously think about it. Now it's intuitive and second nature."
Snapping the Perfect Shot: How to Take Breathtaking Travel Photos on a Budget - Look for Unique Perspectives and Angles
Finding fresh and unexpected vantage points adds intrigue and originality to travel photography. While many default to shooting eye-level scenes from a standing position, exploring unconventional perspectives creates images that captivate and delight viewers. As landscape photographer James Davidson explains, "Look up, crouch down, move around. Observe how minor shifts completely transform images. Small twists unlock big enhancements."
Experimenting with high and low angles illuminates subjects in innovative ways. A bird's-eye view shot from above packs landscapes into the frame. It also diminishes people, evoking fun or even surreal aesthetics. A worm's-eye perspective from ground-level does the opposite, monumentalizing surroundings and towering structures. Sideways vantage points add dynamism through diagonal lines and patterns. And framing through foreground elements like branches or fences adds depth.
Urban photographer Leah Kennedy recounts, "I was shooting a historic opera hall and kept moving around until I found a spot crouching underneath the grand staircase. Shooting upward created interesting geometries and layers." Architecture photographer Michael Dawson says, "Unique facades and streetscapes emerge by perching on objects like benches or stair railings. Embrace odd stances and heights."
Getting creative with reflections and frames also brings refreshing stylization. Ryan McGinley explains, "I incorporate puddles, glass or mirrors to capture doubled city scenes and fractured perspectives." Roxanne King adds, "Framing nature or architecture through openings like windows or bridges lends intimacy."
It does take courage and practice abandoning ingrained habits. "At first I felt timid - people stared as I laid on the ground for worm's-eye views," Kennedy admits. "But once I saw the shots - so much more dynamic than my usual - I became addicted to seeking out unexpected angles." Dawson agrees, "Approach scenes with childlike curiosity. Let go of rigid rules. Unique imagery emerges."
Snapping the Perfect Shot: How to Take Breathtaking Travel Photos on a Budget - Take Advantage of Natural Lighting
Harnessing the nuances of natural light transforms mundane travel photos into transportive masterpieces that immerse viewers in a destination's ambience. As landscape photographer James Davidson articulates, "Light is everything. Mastering it elevates images exponentially, in ways no preset filter or editing hack ever could." Yet manipulating lighting often intimidates novices. Travel photographer Dominic Arizona encourages, "Don't fret artificial complicated techniques. Start simply by opening your eyes to how morning glows, afternoon sun and blue twilights inherently infuse scenes with breathtaking dimension and color."
Golden hour, the hour surrounding sunrise and sunset, offers the most evocative lighting. During this fleeting period, the sun sits low on the horizon, casting a warm, delicate glow and elongated shadows. Landscape photographer Leah Kennedy specifically times shoots for magic hour. She says, "It's incredible how much more vibrant and intense colors become. The world transforms into a living painting." Architecture gains new grandeur as well. Michael Dawson photographs historic buildings exclusively at sunrise or sunset. He explains, "Structures lit directly by low-hanging sun take on an illuminating radiance, like liquid gold oozing down stonework."
Beyond dramatic hues, golden light also contributes flattering portraiture. Gary Peterson excels at capturing glowing candids of locals engaged in cultural traditions. "Soft morning or evening light smooths skin tones," Peterson describes. "It adds depth, accentuating expressions and emotions genuinely." Lighting at midday tends to be harsh. But cloud cover creates a giant diffuser, allowing for even illumination. Ryan McGinley suggests, "Overcast skies act like a giant softbox in portrait photography, perfect for illuminating faces evenly."
Just after sunrise and before sunset, bright blue hours occur as indirect sunlight scatters through particulate air molecules. Landscape photographer Roxanne King revels in this period. "Everything adopts cooler, moodier tones but maintains definition without shadows," she says. "It's the perfect balance - rich tones minus harshness."
Snapping the Perfect Shot: How to Take Breathtaking Travel Photos on a Budget - Edit and Enhance with Free Apps
With a tap of a finger, smartphone apps transform travel photos from dull to dazzling. Post-processing apps provide easy editing tools right on your phone to enhance shots on the go. From tweaking brightness and contrast to applying filters and creating collages, apps empower anyone to turn lackluster snapshots into share-worthy social media eye-candy.
Landscape photographer Leah Kennedy effuses, “Editing apps are magic wands for my images. I use Snapseed to add drama to skies, boost structure details and intensify colors. Suddenly scenes pop as vividly as I remember them.” Enhancement apps also correct common photography problems. Gary Peterson explains, “VSCOCam saves underexposed shots with selective exposure adjustments instead of applying blanket brightness filters that create noise.”
Urban travel photographer Michael Dawson relies on editing apps to compose atmospheric cityscapes. “I use TouchRetouch to remove distracting elements like cars and powerlines from busy scenes. This simplifies compositions, helping key details stand out.” Dawson continues, “Then I accentuate lights, deepen skies and add grain using Afterlight to convey moody city vibes.”
Editing tools empower anyone to stylize images, not just photography pros. “I have no formal training, but Snapseed makes me feel like an artist,” says novice travel photographer Dominic Arizona. “I customize looks by boosting saturation, adding selective highlights and playing with healing brushes to conceal blemishes or objects.” Jack Greenbaum agrees, “Apps like Lightroom Mobile democratize photography by making robust tools accessible, so anyone can unlock their creativity.”
Photo collaging and stacking apps like Layout provide quick and easy ways to showcase trips by combining multiple images into compelling arrangements. Leah Kennedy explains her process: “I pick a collage template and populate it with my best shots from each destination for an instant year-in-review photo journal.” Roxanne King says, “For variety, I use Pic Stitch to layer two exposures of the same scene on top of each other, blending highlights and shadows into one visually striking image.”
Far more than superficial filters, today’s editing apps offer sophisticated capabilities rivalling desktop platforms. But their interfaces remain intuitive. Landscape photographer James Davidson remarks, “I’m blown away by the power of mobile apps. Who needs Lightroom when Lightroom Mobile packs robust features into a streamlined interface that’s satisfyingly simple to navigate?”
Snapping the Perfect Shot: How to Take Breathtaking Travel Photos on a Budget - Invest in a Versatile Prime Lens
While smartphone cameras provide surprising quality these days, avid photographers know that investing in a dedicated camera and lenses ups the ante for travel imagery. In particular, prime lenses take travel photos to the next level thanks to their superior optics, fast apertures for low light shooting, and ability to achieve dramatic shallow depth of field blurring backgrounds artistically. Prime lenses also force you to move your feet to compose shots rather than just zooming in, sharpening creative vision.
Travel photographer Dominic Arizona swears by his go-to 35mm prime lens for capturing expansive landscapes and intimately framed portraits with equal aptitude. He explains, “The moderate wide angle sucks in sweeping vistas while the fast f/1.8 aperture melts backgrounds into painterly bokeh for flattering people shots.” Leah Kennedy prefers a versatile 50mm prime lens. She says, “Normal perspective feels intuitive and natural to the eye. And the super fast aperture isolates details strikingly.”
While zooms offer convenience, many pros admit prime lenses force more thoughtful, impactful image making. Landscape photographer James Davidson says, “Zooms make me lazy. With primes, I move through a scene to find the most compelling angle and really think before clicking the shutter.” Roxanne King agrees, “Primes develop your observational skills and instincts. You start seeing frames everywhere, spotting scenery and moments that make amazing photos.”
Prime lenses also excel in low light situations common while traveling, like candle-lit restaurants or museums. Jack Greenbaum explains, “Fast apertures capture detail in dark interiors that would appear too grainy or blurry with slow zoom lenses.” Pro photographer Gary Peterson says, “I crank up ISO and shoot wide open with my 35mm prime to photograph vibrant night markets, capturing all the visual magic populating the dark lanes with life.”
For those new to interchangeable lenses, 50mm primes offer the most useful balance of framing, aperture speed and price point. Michael Dawson suggests, “Start with a 50mm like the Canon EF 50mm f/1.8. It’s super affordable yet gives beautiful sharpness and background separation for truly professional looking travel shots.” Once hooked, Arizona recommends branching out. “I always have a 35mm and 85mm prime in my camera bag too for wide or telephoto flexibility. Combined, these three focal lengths cover nearly any scenario."
Snapping the Perfect Shot: How to Take Breathtaking Travel Photos on a Budget - Use Slow Shutter Speeds for Dramatic Effects
Harnessing long exposures is an ethereal technique for infusing travel scenes with mystique and visual intrigue. By using shutter speeds of 1 second or longer, photographers can create a signature look that conveys the passage of time andimplies movement. Billowing clouds, light trails, silky water; all take on an ephemeral, almost otherworldly beauty when captured using slow speeds.
Urban photographer Dominic Arizona relies on long exposures to dramatize cityscapes after dark. He explains, “I love arriving at a location right at twilight, then making a series of exposures as night falls, increasing shutter speeds as scenes get darker. Lights and traffic blur into vibrant streaks showing the lively energy of the city.”
For waterfall photography, Michael Dawson uses ND filters to allow 30 second exposures even in daylight. “The ethereal effect removes individual detail so water becomes this smooth, milky abstraction. It’s mesmerizing, letting you visualize the immense power and constant motion,” he describes.
Coastal photographer Leah Kennedy agrees that slow shutter speeds work magic with water. “Seascapes feel serene yet full of life and luminescence, especially if you incorporate a bit of motion like waves or clouds. The world reveals its dynamism.” She also incorporates zooming and camera movement during exposures to further accentuate this sense of flux.
Don’t be intimidated by the perceived complexity of long exposure work. While neutral density filters help extend shutter speeds, photographer James Davidson insists they aren’t essential. “ND filters are useful at times but don’t get hung up on gear. Simply using your camera on a tripod enables multi-second exposures for luminous low light and night images.”
Jack Greenbaum specializes in star photography and encourages newcomers to experiment. He suggests starting with 15-30 second exposures at wide apertures to capture celestial motions. "You'll be amazed how star trails emerge even with basic techniques," says Greenbaum. "Then you can get more advanced incorporating time lapses and stacking multiple long exposures to illustrate galactic swirls."
The most crucial skill when embracing long exposures is learning to balance aperture, ISO and shutter speed to acheive proper exposure spanning seconds or minutes. Doing test shots and checking histograms prevents under or overexposure. Roxanne King explains, "The reciprocity law of long exposures means calculations get thrown off. Simply tweak settings and check results until rich blacks and clean highlights emerge beautifully."
Snapping the Perfect Shot: How to Take Breathtaking Travel Photos on a Budget - Tell a Story Through Your Photo Series
Beyond capturing striking individual travel images, assembling photos into a narrative sequence elevates work to an art form that immerses viewers and conveys meaningful stories. Sequencing images purposefully turns photographs from forgettable snapshots into enthralling visual journeys that stick with audiences long after swiping past.
Travel photographer Leah Kennedy specializes in series that chronicle experiences unfolding step-by-step. She explains, “I get to know a place deeply over many days or weeks. Then I curate photos into a visual storyline conveying that gradual immersion and revealing hidden facets readers miss in typical tourist shots.”
For urban architecture buff Michael Dawson, series focus on the interplay of light and geometry over time. “I’ll revisit iconic landmarks at different day stages," he describes. "Shooting tight details bathed in dawn’s glow, to wider night vistas with building lights sparkling like jewels against inky skies. Juxtaposed chronologically, photos illustrate shifting personalities."
Street photographer Dominic Arizona also utilizes series to spotlight glimpses of daily life. “By patiently shooting similar scenes repeatedly, moments or characters come and go, interweaving a rich tapestry of a community's soul and rhythms,” Arizona explains. “Like a flip book, a sequence connects scattered instants into a resonant big picture.”
Series shine capturing extended experiences like road trips. Jack Greenbaum frames progressions chronologically to simulate the trip’s flow. “I want viewers to feel transported, like they’re riding shotgun scanning the changing landscapes out the window,” he says. “Sequencing imparts momentum and conveys the continuity and passage of the journey.”
Sometimes a narrative arc gets conveyed in a single frame. Gary Peterson, who documents indigenous communities, explains: “I move through scenes methodically, then assemble shots almost like a movie editor to build tension and surprise that climaxes in a decisive final moment.” Carefully ordered series have the power to genuinely move people. Peterson continues, “When the sequence connects you to a place’s identity, viewers remark feeling like they lived a profound moment, even if they never left home.”